Currently, we're trying some software updates in Eclipse but with no luck, we could not do an update in its ADT version from 22 to 23. We tried uninstalling the ADT 22 package but ended up with another error message saying it could not be uninstalled. Since we have a deadline to catch up, one of my colleagues tried to download a new copy of the Eclipse ADT in his unit but ended up with another error.
A prompt message that shows...
"Failed to create the Java Virtual Machine"
This is another challenge for us, so we then surf the internet for immediate answers but there were no clear solutions. Though most of the thought was correct, it seems that the instruction was a bit foggy for us newbies in Eclipse. So for the solution, we ended up copying a few of the contents in the eclipse.ini file of our original Eclipse folder.
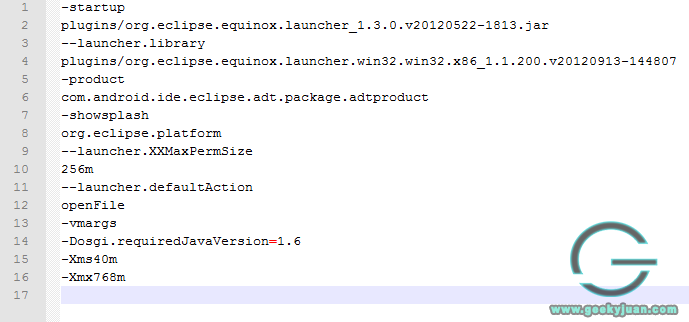
The solution was just, we need to lower the size indicated in our settings for us to be able to run the program. If you would look at the image below, we just changed the ones on line 15 and 16.
Originally, it was set to:
- Xms512mWe just lowered that to our desired and capable size and alas!
-Xmx1024m
Eclipse started running again smoothly!
Have you encountered this before? If so, did we end up doing the same? Share us your thoughts on the matter. Thanks!


.JPG)


Post a Comment